
There is a very specific kind of frustration that comes from receiving a sample that is the wrong size.
Not wrong by a lot. Not obviously broken. Just — a centimetre too tight at the bust. A centimetre too narrow across the shoulder. A waistband that sits half an inch lower than it should. You send it back with corrections. The next sample comes back. It is still wrong, in ways that are similar but not identical to the last time. The process repeats.
In many cases — far more than most brands realise — the root cause of this particular problem is not the machinist, not the factory, and not the fabric. It is seam allowance. Specifically, it is a mismatch in seam allowance assumptions between the pattern, the studio, and the factory.
Understanding seam allowance is not glamorous. It will not make your designs more exciting or your brand more compelling. But it will stop you losing thousands of pounds to sampling rounds that should never have been necessary — and it will make you a significantly more effective client to work with at every stage of garment development.
What is seam allowance?
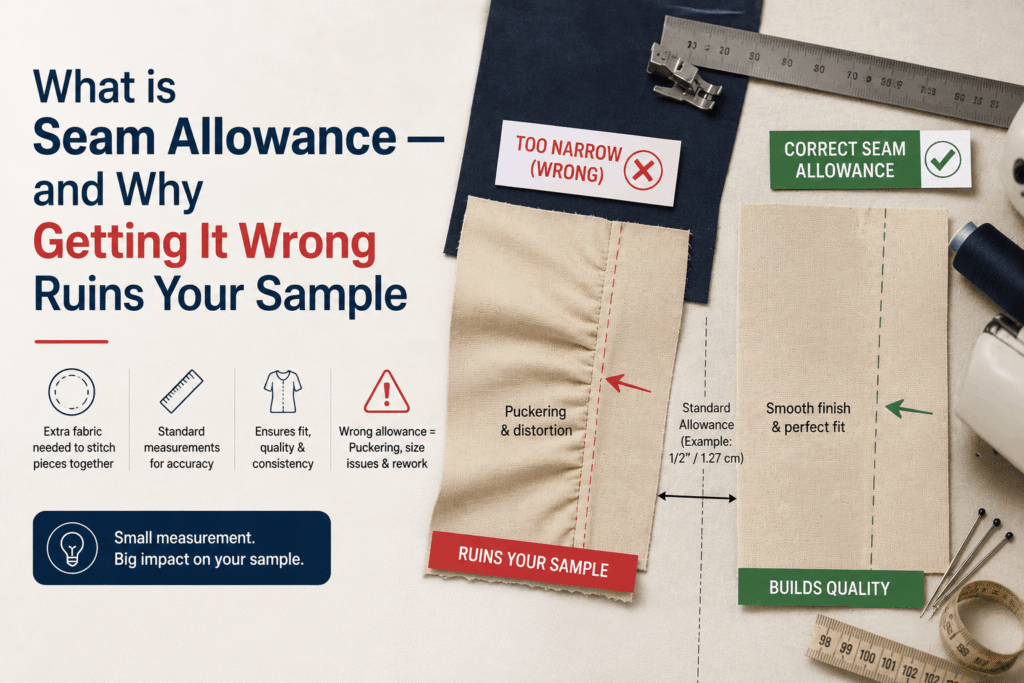
Seam allowance is the strip of fabric between the cut edge of a pattern piece and the line where it is sewn to the adjacent piece. It is the margin of fabric that disappears inside the finished garment, sewn into the seam and hidden from view.
When a factory cutter lays a pattern piece on fabric and cuts around it, they cut to the outer edge of the pattern. The machinist then sews along a line set back from that outer edge by the seam allowance amount. The fabric between the cut edge and the sewing line is the seam allowance — it holds the seam together, gives the machinist room to work, and in some cases provides fabric for future alterations.
The key number — the one that causes problems when it is misunderstood — is how far back from the cut edge the machinist sews. That distance is the seam allowance, and it must be the same number that the pattern cutter had in mind when they drafted the pattern.
When it is not, every measurement in your garment is wrong.
Why seam allowance affects the finished size of your garment
This is where many brand founders have a moment of genuine surprise, so it is worth explaining carefully.
Imagine a bodice front pattern piece that measures 50cm across the bust at its widest point. The pattern cutter drafted it with a 1cm seam allowance on each side seam — meaning the finished garment measurement at the bust, once those seams are sewn, will be 48cm (50cm minus 1cm on each side).
Now imagine the factory assumes a 1.5cm seam allowance instead of 1cm. They cut to the same pattern edge — 50cm — but they sew 1.5cm from the edge on each side. The finished bust measurement is now 47cm. The garment is 1cm tighter than it should be across the bust — not because the pattern changed, not because the machinist made an error, but because of a half-centimetre difference in assumed seam allowance on each side seam.
On a fitted garment, 1cm at the bust is the difference between a garment that fits and one that does not. And because the same mismatch applies at every seam on every piece, the size errors compound across the whole garment.
This is why what is pattern cutting matters so deeply at a technical level — the seam allowance is not a finishing detail. It is baked into every measurement in the pattern from the moment the first line is drawn.
What is the standard seam allowance in UK garment production?
In UK and European garment production, the most widely used seam allowances are:
- 1cm — the standard for most garment seams in contemporary UK and European production. Side seams, shoulder seams, panel seams, armhole seams, and sleeve seams typically use 1cm in professional studio work.
- 1.5cm — used on body seams where a slightly wider margin is preferred for stability or for garments that may require alteration (bridal, occasion wear, made-to-measure).
- 2cm or more — used on waistbands, hems, and any area where ease of alteration is a specific requirement.
- 0.5–0.7cm — used on curved seams such as the armhole and neckline, where a narrower allowance reduces bulk when the seam is clipped and pressed.
These are professional industry standards — not home sewing conventions. It is worth being aware that home sewing patterns commonly use 1.5cm or even 5/8 inch (approximately 1.6cm) as their standard. If your pattern cutter or factory has a home sewing background rather than a professional production background, their default assumptions may differ from the UK industry standard.
Where seam allowance mismatch most commonly occurs
Working with overseas factories
This is the most common source of seam allowance problems for startup brands. Factories in different countries have different standard seam allowances built into their workflows.
Many factories in China, for example, work with a 1cm standard on most seams. Others apply 0.7cm on curved seams automatically. Some factories apply their own seam allowances to patterns that arrive as net patterns — and the amount they add may differ from the amount your studio intended.
When you send patterns overseas without an explicit, written seam allowance specification, you are relying on the factory’s default. Their default may not match your pattern. The difference shows up in the sample.
Net patterns vs gross patterns
This is a source of confusion that catches many startup brands, particularly those working across multiple studios or factories.
A gross pattern (also called a cut pattern or a pattern with seam allowances) includes the seam allowance already built into the pattern piece. The factory cuts to the edge of the piece and sews at the standard amount from the edge. This is the most common approach in UK professional studio work.
A net pattern (also called a finished pattern or a pattern without seam allowances) represents only the finished dimensions of the garment — the line on the pattern is the sewing line, not the cutting line. The factory adds their own seam allowance beyond that line before cutting.
The problem arises when a gross pattern is sent to a factory that assumes it is a net pattern — or vice versa. The factory either doubles the seam allowance or omits it entirely. Both produce garments that are significantly the wrong size.
Every studio and factory in your supply chain must be aligned on which approach is being used, in writing, before any cutting begins.
Inconsistent allowances within the same pattern
A subtler problem — and one that is a direct reflection of pattern cutting quality — is inconsistent seam allowances within the same pattern. If the side seam of the front bodice has 1cm seam allowance but the corresponding side seam of the back bodice has 1.5cm, the seams will not match when the machinist tries to sew them together.
This kind of inconsistency is a pattern cutting error. As part of what a pattern cutter does, checking that all corresponding seams carry consistent allowances is a fundamental quality check.
How seam allowance interacts with pattern markings
Seam allowance does not exist in isolation on a pattern piece. It works in direct relationship with the other markings — particularly the grain lines, notches, and construction notes.
As covered in our guide to pattern markings in fashion, a production-ready pattern piece communicates everything the factory needs through its markings. The seam allowance is part of that communication system.
When a pattern is delivered in CAD digital format, all markings — including the seam allowance — should be encoded within the file. Before sending digital patterns to any factory, confirm that seam allowances are included in the file and that the factory’s software will read them correctly.
Different seam allowances for different seams
Not every seam on a garment uses the same allowance. A well-drafted pattern applies different allowances based on construction requirements:
- Body seams (side seams, panel seams, shoulder seams): Standard 1cm in UK production. Straight or gently curved seams that are typically overlocked and pressed.
- Armhole and sleeve seams: 1cm on the bodice armhole, 1cm on the sleeve seam — with the sleeve head often reduced to 0.7cm at the crown to reduce bulk.
- Neckline seams: 0.7–1cm. A narrower allowance reduces bulk when the seam is clipped and the facing is turned.
- Crotch and inseam seams (trousers): 1–1.5cm. The crotch seam is a high-stress area and a wider allowance provides better durability.
- Waistbands: 1–1.5cm at the waistband seam join.
- Hems: 1.5–3cm depending on the garment, fabric weight, and hem finish. Blind-hemmed womenswear often uses 2–2.5cm; topstitched casual hems may use 1.5cm; tailored trousers typically use 3cm.
How to protect yourself from seam allowance problems
The good news is that seam allowance problems are almost entirely preventable. They are caused by misaligned assumptions that can be resolved with explicit conversations and written confirmations.
Step 1: Establish the standard with your studio
When you begin working with a pattern cutter, confirm explicitly which seam allowance standard they will use and whether the patterns will be gross or net. Get this in writing. As covered in our guide to how to brief a pattern cutter, the briefing meeting is the right moment to ask these questions.
Step 2: Confirm with your factory before patterns are sent
Before your patterns leave the studio, brief the factory explicitly: the patterns include seam allowances (or do not), and the standard used is X. This confirmation should be in writing. If you are manufacturing overseas, this is particularly important.
Step 3: Check for consistency when you review patterns
Before approving patterns for production, check that seam allowances appear consistent across corresponding seam edges. The front bodice side seam and the back bodice side seam should carry the same allowance. Mismatches at this stage are inexpensive to correct.
Step 4: Use the sample size check
When your first sample arrives, measure it against the specification from your tech pack. If measurements are consistently smaller or larger by a consistent margin, a seam allowance mismatch is the most likely cause. Identify it and correct the briefing before the next sample is made.
How seam allowance fits into the full development process
Seam allowance is a detail — but it is a detail that threads through every stage of garment development, from the first pattern draft to the production run.
When you understand how to go from sketch to garment, you can see where seam allowance decisions are made (at pattern cutting stage), where mismatches are most likely to emerge (at sampling), and where the consequences are most expensive (in production).
Understanding flat pattern cutting vs draping helps here too — both methods result in pattern pieces with seam allowances applied, but the way allowances are handled can differ between manual and digital workflows. Confirm that the same standard has been applied consistently throughout.
The five seam allowance rules every brand founder should follow
- Rule 1: Confirm the seam allowance standard with your pattern cutter before drafting begins. Get it in writing.
- Rule 2: Confirm whether patterns are gross (allowances included) or net (allowances not included). State this explicitly in every factory brief.
- Rule 3: When working with overseas factories, never assume they share your studio’s standard. Always specify.
- Rule 4: When reviewing patterns before factory handover, check that corresponding seam edges carry consistent allowances.
- Rule 5: If a sample comes back consistently tighter or looser than specified, investigate seam allowance mismatch before ordering another round.
These five rules cost nothing to follow. Ignoring any one of them can cost a full sample round — or more.
Want patterns that are built to production standards from the start? Book a free consultation with A Pattern Cutter →
Frequently Asked Questions
What is the difference between seam allowance and hem allowance? Seam allowance refers to the fabric margin on any seam where two pieces are joined. Hem allowance refers specifically to the fabric margin at the bottom edge, which is folded up to form the hem. Both provide fabric beyond the finished edge for construction, but hem allowances are typically wider because the hem fold requires more fabric to hang and press correctly.
Should seam allowances be the same on every seam? No — a well-drafted professional pattern uses different allowances based on construction requirements. Curved seams use narrower allowances; straight body seams use the standard; hems and waistbands use wider allowances. What matters is that corresponding seam edges carry the same allowance.
My factory says they “add their own seam allowances” — what does this mean? It means your factory works with net patterns. If your studio delivers gross patterns (allowances already included), you must tell the factory explicitly — otherwise they will add their own allowance on top, making every piece larger than intended.
Can seam allowances be changed after a pattern is graded? Technically yes, but it requires going back through every graded piece. It is far cleaner to confirm the correct allowance before grading begins.
Does the type of fabric affect seam allowance? Yes. Very lightweight fabrics benefit from narrower allowances on curved seams. Heavy fabrics may need wider allowances. Fabrics that fray significantly need allowances wide enough to accommodate overlocking. Your pattern cutter should factor fabric behaviour into allowance decisions as part of the drafting process.
This post is part of the Pattern Cutting 101 series from A Pattern Cutter — a pattern cutting, grading, toiling, and sampling studio based in North London, working with fashion startups and growing brands.
Book a free consultation → | View our services → | Read the full blog series →