
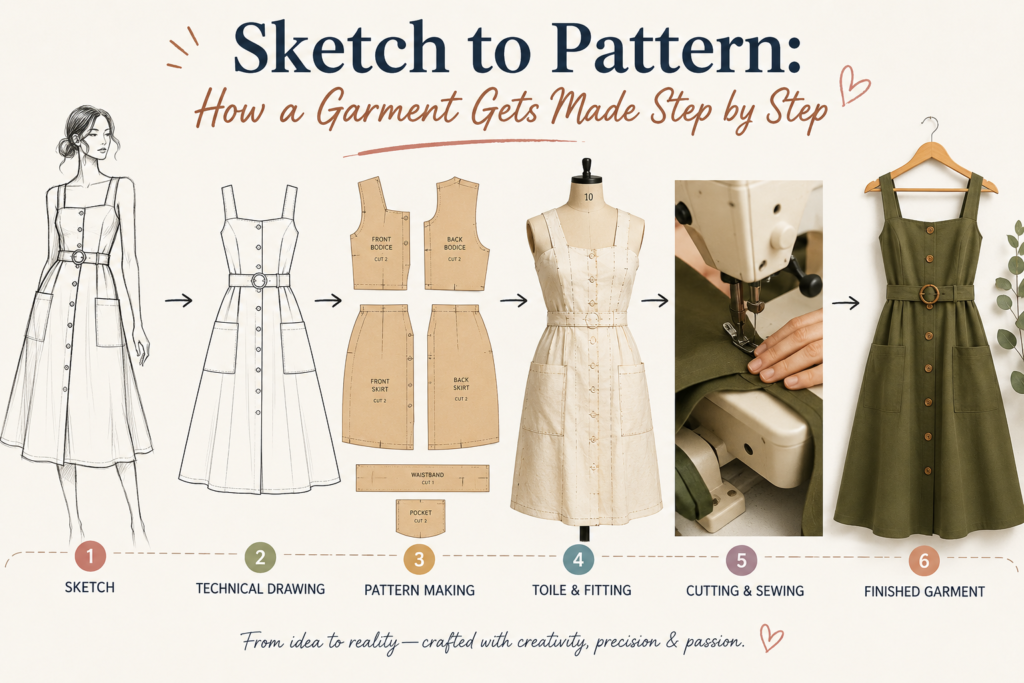
One of the most common moments of frustration for a startup brand founder is somewhere around week four of development, when they realise that the gap between a sketch and a finished garment is significantly wider — and more technically complex — than they anticipated.
The sketch existed. The vision was clear. And then came the questions: what is a tech pack? What does the pattern cutter need from me? What is a toile and do I need one? Why is the factory asking for a DXF file? When does grading happen?
If you have found yourself in any version of that moment, this guide is for you.
What follows is an honest, plain-language walkthrough of the full garment development journey — from the first sketch on paper to a production-ready garment in a factory. Every stage is explained clearly, including what it costs to skip one, what typically goes wrong, and what you actually need to prepare at each step.
Why this process exists
The process of developing a garment from sketch to production is not bureaucracy. Every stage exists because someone, somewhere, learned what happens when you skip it.
The toile stage exists because expensive fabric is wasted when a pattern that has never been tested is cut straight into it. The tech pack exists because factories interpret gaps in information in ways that rarely match the designer’s intent. Grading exists because a pattern that works in a size 10 does not automatically work in a size 16 — and the difference matters enormously to the customer wearing it.
Understanding why each stage exists helps you engage with it properly — and helps you make informed decisions about where your development budget is best spent.
Stage 1: The design
Every garment begins as an idea. But for that idea to move forward, it needs to be communicated in a form that other people — who are not inside your head — can work from.
At the design stage, your job is to document your design clearly enough that a pattern cutter, a machinist, and eventually a factory can all understand exactly what you are trying to make.
What this means in practice
Front and back sketches. A flat drawing of the garment from both front and back, showing the correct silhouette, proportions, and the position of any key details — seams, pockets, closures, collars, cuffs. The sketch does not need to be a professional illustration. It needs to be clear.
Annotations. Notes on the sketch describing details that cannot be seen from the drawing alone: where a seam is positioned, what type of closure is used, how a collar should roll, whether a pleat is pressed or unpressed.
Fabric information. The type of fabric you plan to use — woven or knit, weight, composition if known. This matters because what is pattern cutting involves making decisions about ease, grain, and construction that are directly influenced by the fabric.
Reference garments or images. If there is a silhouette, a detail, or a fit that you want to replicate or reference, showing it physically is often more accurate than describing it in words. A reference garment communicates volumes.
What typically goes wrong at this stage
Vague or incomplete designs arrive at the pattern cutter and the machinist makes assumptions. Every assumption is a potential fit problem. The more clearly you can document your design intent before development begins, the fewer assumptions get made — and the fewer sampling rounds you need.
Stage 2: The tech pack
A tech pack — short for technical package — is the definitive technical document for your garment. It is the document that travels with your design through every stage of its development and production life, and it is the primary communication tool between you, your development studio, and your factory.
What a tech pack contains
- Flat sketches — front, back, and any key detail views
- Garment measurements — a full measurement specification chart for every key point on the garment, in the base size
- Construction details — seam types, stitch specifications, seam allowances, finishing methods
- Bill of materials (BOM) — a complete list of every fabric, lining, interlining, trim, label, care label, and hardware the garment requires
- Colourway information — Pantone references or fabric references for every colour option
- Care and labelling instructions
- Grading chart — once the size range is confirmed
Do you need a tech pack before pattern cutting begins?
Ideally, yes. A well-prepared tech pack gives the pattern cutter everything they need to draft the pattern accurately, without gaps that require assumptions.
In practice, many startup brands begin development without a complete tech pack — and a good studio will help you build one as part of the briefing process. What matters is that the tech pack is completed before the garment moves to sampling, because the factory cannot produce to a standard that has not been fully documented.
Stage 3: Pattern cutting
With the design documented and the tech pack in progress, the pattern cutter begins work. This is the stage that transforms your design from a document into a set of physical or digital templates — the patterns — that allow your garment to be cut from fabric.
Understanding what is pattern cutting in full is worth your time as a founder. The short version: the pattern cutter creates each individual piece of the garment — the bodice, back panel, sleeves, collar, facings, pockets, and any other components — with millimetre precision, labelled with all the markings a factory needs to cut and assemble the garment correctly.
How patterns are created
The method used depends on the garment and the studio. Our guide to flat pattern cutting vs draping covers the two main approaches in detail. For most commercial startup brand garments, flat pattern cutting — working from a block on paper or in CAD software — is the primary method.
Stage 4: The toile
The toile — pronounced “twall” — is a test garment made from inexpensive cotton fabric, usually calico, before any expensive fabric is cut. It is the quality control stage for the pattern, and it is one of the most important investments you can make in your development process.
What happens at a toile fitting
The toile is made from the pattern pieces and put onto a fit model or dress stand. The pattern cutter — and ideally the brand founder — observes the garment carefully. Does the shoulder sit correctly? Is the armhole the right depth and shape? Does the side seam hang straight? Is there enough ease at the bust and hip? Is the collar sitting flat?
Any corrections identified during the fitting are made directly to the pattern — not to the toile itself. The toile is discarded; the corrected pattern moves forward.
Why skipping the toile is a false economy
The toile is made in calico that costs a few pounds per metre. A sample in your final fabric costs whatever your fabric costs — which may be significantly more — plus machinist time, plus any trims and hardware. If that sample has a fit problem that requires correction and a re-make, you have paid for the problem twice.
A toile catches the problem first, in the cheapest possible material, before any of that cost is incurred. In most cases, the toile is the most cost-effective single investment in your whole development process.
Stage 5: The sample
Once the pattern has been approved — either through a toile fitting or, for very simple styles, directly — the first sample is made in your chosen fabric, with your chosen trims, labels, and finishes.
How many sample rounds should you expect?
For a well-drafted pattern with a good toile stage behind it, one to two sample rounds before approval is typical. Each round takes time — usually two to four weeks with a UK studio, longer with overseas factories.
Stage 6: Grading
Once the sample is approved, the pattern moves into grading. Grading is the process of scaling the approved base pattern up and down into your full size range, while maintaining the fit and proportions of the original across every size.
Grading can be done manually or digitally using CAD pattern cutting software. Digital grading is faster and more consistent, particularly for wide size ranges.
Stage 7: Production preparation
With approved patterns and a completed tech pack, you are almost ready for production. The complete documentation package you hand to the factory should include graded patterns, completed tech pack, size chart, approved fabric and trim samples, and your approved PP sample.
How long does the whole process take?
For a single style, from a clear design brief to production-ready patterns, allow a minimum of eight to twelve weeks. For complex or structured garments, allow longer.
The most common places it goes wrong
- Unclear or incomplete designs at the start. Vague briefs produce patterns full of assumptions.
- Skipping the toile. A false economy that routinely costs more in extra sampling rounds.
- Starting grading before the sample is approved. A common shortcut that creates significant extra work.
- Incomplete documentation for the factory. A tech pack with gaps produces production errors.
- Underestimating the timeline. Building a collection on a twelve-week runway when the process needs twenty.
How A Pattern Cutter supports you through the process
Our North London studio works with fashion startup brands and growing businesses at every stage of the development journey — from the first briefing conversation through to production-ready patterns, toiling, sampling, and grading.
We handle pattern cutting, toiling, and grading under one roof, which means the communication between stages is clean, the timeline is tighter, and you deal with one team throughout the process.
If you are building your first collection, book a free consultation. We will walk you through the realistic timeline, what to prepare, and how to approach development in a way that keeps your costs under control.
Book a free consultation with A Pattern Cutter →
Frequently Asked Questions
Do I need a tech pack before I can start pattern cutting? Not necessarily — a skilled pattern cutter can work from detailed annotated sketches. But a complete tech pack produces better patterns with fewer gaps.
Can I go straight from sketch to sample without pattern cutting? Some factories offer this, but it produces a pattern that belongs to the factory — not to you — and that is typically not graded or documented.
Can one studio handle the whole process? Yes — and it is usually the most efficient approach. At A Pattern Cutter, we offer pattern cutting, toiling, sampling, and grading from our North London studio.
This post is part of the Pattern Cutting 101 series from A Pattern Cutter — a pattern cutting, grading, toiling, and sampling studio based in North London, working with fashion startups and growing brands.