Your first meeting with a pattern cutter is one of the most important conversations in the life of your first collection. Get it right and the development process flows — patterns are drafted with confidence, sampling rounds are kept to a minimum, and your garments reach production close to what you envisioned. Get it wrong — or arrive underprepared — and the pattern cutter spends the first hour asking questions you cannot answer, makes assumptions to fill the gaps, and the first pattern reflects those assumptions rather than your design.
The good news is that being well-prepared for this meeting is not complicated. It does not require a degree in garment technology or a perfectly finished tech pack. It requires clarity — about your design, your customer, your fabric, and what you are trying to achieve.
This guide walks you through exactly what to prepare, item by item, and explains why each element matters to the pattern cutter and to the quality of the pattern they produce for you.
Why preparation matters so much at this stage
Before diving into the checklist, it is worth understanding what the pattern cutter is actually trying to do in your first meeting — and why the information you bring directly affects the output.
As covered in our guide to what does a pattern cutter do, the pattern cutter’s job is to translate your design intent into a set of precise, workable templates. That translation requires a thorough understanding of: what the garment looks like, what it is made from, who it is intended for, and how it is meant to fit.
Every piece of information you cannot provide is a gap the pattern cutter must fill with a judgement call. Some of those calls will be correct. Some will not. And the ones that are not correct show up in the toile fitting — as a shoulder that sits wrong, a side seam that pulls, an armhole that restricts movement. Corrections at that stage cost studio time. Corrections at sampling stage cost fabric and money. Corrections that reach production cost everything.
The most effective thing you can do to reduce your sampling rounds and keep your development costs under control is to walk into your first meeting as prepared as possible.
What to bring — the complete preparation checklist
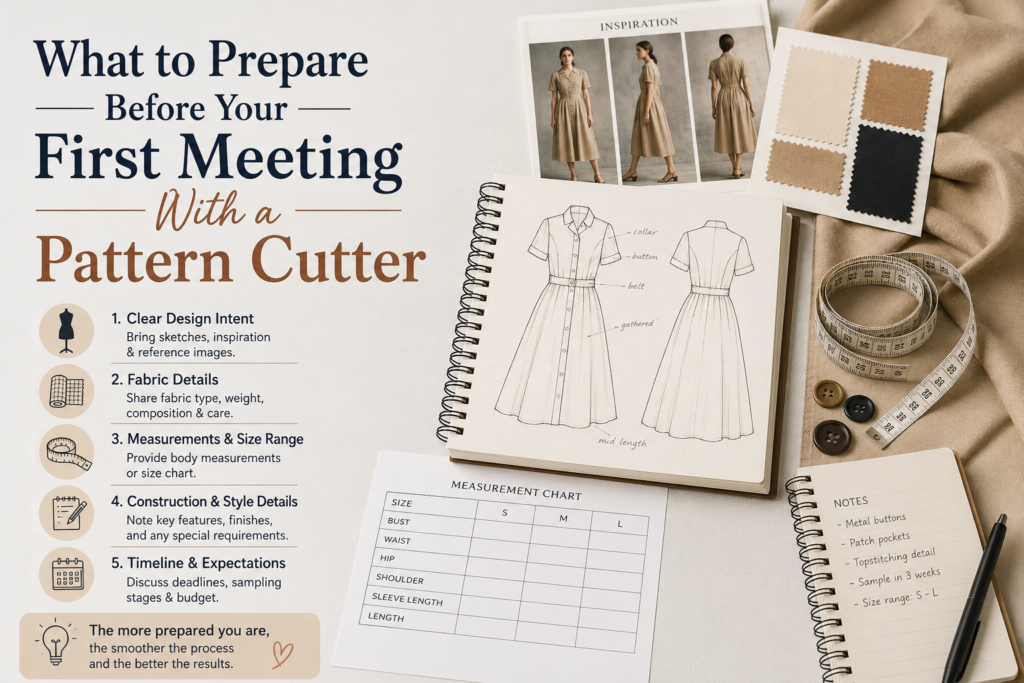
1. Design sketches — front, back, and key details
This is the most fundamental thing you can bring. A clear flat drawing of each garment you want to develop, showing:
Front view — the complete front of the garment, drawn as flat and as proportionally accurate as you can manage. This is not a fashion illustration — it is a technical drawing. It does not need to be beautiful. It needs to be clear.
Back view — the complete back. This is where many founders fall short. The back of a garment contains critical information — yoke lines, back openings, back seam positioning, back neckline shape — that cannot be assumed from the front.
Detail views — close-up drawings of any features that need specific explanation: a collar construction, a pocket detail, a cuff, a specific seam line. If it is important to the design, draw it separately and annotate it.
Annotations — notes written directly onto or alongside the sketch explaining details that the drawing alone cannot communicate. Where is the zip positioned? Is that pleat pressed or unpressed? How does the neckline edge finish? Is the collar a shirt collar or a stand collar? What type of closure is it?
The sketch does not need to be a professional illustration. Hand-drawn flat sketches, clearly annotated, are often more useful than beautiful fashion illustrations that do not show construction detail.
2. Your measurements — or a reference garment
The pattern cutter needs to know who they are making the garment for. There are two ways to communicate this:
A measurement chart. The key body measurements of your target customer in the size you want to develop first — your base or sample size. For womenswear, this typically includes: bust, waist, hip, back length (nape to waist), front length, shoulder width, sleeve length, and arm circumference.
A reference garment. A physical garment whose fit you want to replicate or use as a starting point. This is often the most direct way to communicate fit intent — rather than describing in words how much ease you want at the bust, you can simply show a garment whose ease you like. The pattern cutter can measure it, assess the fit philosophy, and use it as a guide.
If you have both a measurement chart and a reference garment, bring both. They complement each other — the measurements give precision, the garment gives context.
3. Fabric swatches or fabric information
Fabric is not a detail that can be decided after the pattern is drafted. As explained in our guide to what is pattern cutting, the fabric directly influences how the pattern is drafted — the ease allowances, the grain direction, the construction details, and in some cases the method used (whether flat pattern cutting or draping is more appropriate).
A jersey top in a medium-weight ponte is drafted very differently from the same silhouette in a lightweight silk charmeuse. A structured jacket in a firm tweed behaves differently from the same jacket in a soft woven. The pattern cutter needs to understand your fabric before they begin — not after.
Be as specific as you can about stretch fabrics. If the garment will be made in jersey or any stretch fabric, bring the actual fabric or a swatch if at all possible. The amount of stretch — two-way, four-way, and how much recovery — has a direct effect on how much ease is built into the pattern.
4. Your fit philosophy — in your own words
One of the most important conversations in a pattern cutting briefing is about fit — and it is one that many brand founders arrive underprepared for, because they have never been asked to articulate it explicitly before.
Your fit philosophy is simply: how do you want your clothes to feel and sit on the body? Some questions to think through before your meeting:
- Overall fit preference: Close, fitted, relaxed, oversized? For each garment, what is the intended relationship between the body and the garment?
- Ease preferences: Do you want minimal ease (a close, body-skimming fit)? Moderate ease (comfortable and wearable but not oversized)? Generous ease (deliberately relaxed or voluminous)?
- Specific areas: Are there particular areas of fit that matter most to your brand? Some brands are very exacting about the shoulder and armhole. Others care most about the waist and hip relationship.
- Who is wearing this? The same size 12 can have a very different fit depending on whether your target customer is a 25-year-old whose priority is how a garment looks, or a 45-year-old whose priority is how it moves and feels.
5. Your intended size range
You do not need to have your full size range finalised at the first meeting, but the pattern cutter needs to know:
- What is your base or sample size? This is the size the first pattern will be drafted in — typically a middle size in your planned range.
- What size range do you plan to offer? This matters for discussions about grading and whether CAD pattern cutting is the right approach for your development.
- Are there any specialist sizing considerations? If your range includes plus size, petite, tall, or maternity sizing, raise this at the first meeting.
6. Reference images and mood references
Beyond the technical sketch, visual references help the pattern cutter understand the aesthetic context of your design — the spirit of what you are trying to achieve, not just the technical specification.
- Runway or editorial images that capture a silhouette, a fit, or a construction detail similar to what you are designing.
- Competitor or reference brand images showing the kind of garment or fit you are aiming for. Be specific — show the pieces you actually want to reference.
- Your own brand references — any existing pieces from previous seasons, lookbook images, or product photography.
7. A clear brief on your timeline
Pattern cutting studios work to schedules. Before your meeting, think through:
- When do you need the first toile or sample? Work backwards from your deadline. As covered in our sketch to garment guide, a single style from pattern cutting to approved sample typically takes eight to twelve weeks.
- How many styles are you developing? One or two styles developed sequentially is very different from a ten-style collection developed in parallel.
- Do you have any flexibility in the deadline? If the timeline is fixed, say so upfront. It allows the studio to plan your project realistically.
8. A budget conversation — even a rough one
Many brands find it uncomfortable to discuss budget before a project begins. But a brief, honest conversation about what you have to work with helps a studio advise you more effectively — on how many styles to develop simultaneously, whether a toile is essential or can be skipped for simpler styles, and what level of complexity is realistic within your constraints.
What a good pattern cutter will ask you
A well-prepared meeting is a two-way conversation. The pattern cutter will have their own questions — and the answers you give will shape the patterns they produce:
- “What fabric is this made in?” — Because ease, grain, and construction all depend on the fabric.
- “Who is wearing this, and what size are you developing?” — Because the block and the ease allowances are built around a specific body.
- “How do you want this to fit — close, relaxed, oversized?” — Because the same sketch can be interpreted in radically different ways depending on fit intent.
- “Do you have a reference garment?” — Because a physical garment communicates fit more precisely than words alone.
- “What is your timeline and how many styles are you developing?” — Because the studio needs to plan your project realistically.
- “Do you need digital pattern files for your factory?” — Because the output format affects the tools used. Our guide to CAD pattern cutting covers when digital files matter.
What the pattern cutter will do with what you bring
Once they have your brief, the pattern cutter will typically: review your sketches and ask clarifying questions, assess your fabric, take or confirm measurements, discuss fit intent in detail, and agree a timeline and scope of work.
From there, they draft the pattern — working from your block or developing a new one, using the appropriate method for your garment, and producing pattern pieces marked with everything the machinist and factory will need.
The quality of that first draft is a direct reflection of the quality of the brief you gave.
A note on what to do if you are not fully ready
Many startup brands come to their first meeting without everything on this list. That is understandable — particularly for founders who are new to the development process.
A good studio will help you fill the gaps. They can help you think through your fit philosophy, advise on fabric choices, or work with a partial brief and flag the assumptions they are making.
What matters is that you come with the clearest picture you can, and that you are honest about what you do not yet know. A pattern cutter who knows where the gaps are can manage them. One who does not know will draft a pattern full of invisible assumptions that only show up at the toile or sample stage.
Summary checklist — bring this to your first meeting
Before your meeting with A Pattern Cutter or any development studio, run through this checklist:
- Front and back sketches for each style, clearly annotated
- Detail sketches for any construction features that need explanation
- Measurement chart for your base size OR a reference garment (ideally both)
- Fabric swatches, or detailed fabric information (type, weight, stretch, fibre)
- A clear sense of your fit philosophy (close, relaxed, oversized — and any specific areas of priority)
- Intended size range and base size
- Visual references (runway, editorial, competitor, or brand references)
- Your timeline — when you need samples, how many styles you are developing
- A rough sense of your development budget
The more of these you bring, the more productive the meeting — and the closer the first pattern will be to what you had in mind.
Ready to book your first consultation? Get in touch with Best Pattern Cutter Services in london — our studio works with startup brands and growing fashion businesses at every stage of development.
Frequently Asked Questions
Do I need a fully finished tech pack before my first meeting? No — a good studio can work from detailed annotated sketches and a thorough briefing conversation. That said, a tech pack always produces better results because it forces you to answer all the key questions before development begins.
What if I only have a rough sketch — is that enough? A rough sketch can be a starting point, but the more detail it contains, the better. The pattern cutter needs to understand every key element of the design — not just the silhouette but the construction, the seam lines, the closures, the collar, the cuff, the pocket placement.
My designs are based on existing garments I own — can I just bring those? Yes, and a reference garment is often one of the most useful things you can bring. It allows the pattern cutter to see and handle the fit and construction directly, rather than interpreting it from a drawing.
I am not sure about my fabric yet — should I wait until I have it before booking? You do not need to have your fabric finalised — but you should have thought about it. At minimum, know whether your garments are woven or knit, structured or fluid, and whether any stretch is involved.
Should I come with a budget in mind? It helps. Knowing your constraints allows the studio to advise you on where to focus your development spending. If budget is tight, an experienced studio will tell you which garments most need a toile, which can go straight to sampling, and how to sequence your collection to keep costs manageable.
How long does the first meeting usually last? For a collection of several styles, allow at least an hour — and ideally ninety minutes to two hours. For a single style with a clear brief, thirty to forty-five minutes may be enough.
This post is part of the Pattern Cutting 101 series from A Pattern Cutter — a pattern cutting, grading, toiling, and sampling studio based in North London, working with fashion startups and growing brands.